

How to Make Hot Process Soap
- Apr 16
- 10 min read

Our Introduction to Soap Making
The time has come to finally write down our soap process. I have taught many friends and family members over the last six years of making soap, but I want this treasured skill to reach farther than my little circle. We don't want to be gatekeepers of skills that can serve your family.
I learned to make soap from my mom in 2020 when the world was in crisis mode about germs. I did not want to learn how to make soap for this particular reason, it just-so-happened to coincide. We started making single loafs, then quickly started sharing it with neighbors and family out of sheer excitement. Eventually we started selling it at the natural health foods store in town, too. When we moved from Alaska, we sold the business to a friend and made our way south.
A couple of years later, we picked up soap making again in the same manner so as to serve our family in a world where safe soap is really hard to find. Not to mention the specialty soap world is often expensive and nothing we tried was quite like ours. My recipes flooded my memory with ease and we began to make soap more regularly, selling it once more as folks requested it more consistently.
What is Soap?
Soap technically defined is made of a compound of oils or fats with sodium hydroxide(lye) or another strong alkaline substance. Typically body washes and shampoos or conditioners are not actually soap, they are detergents. Soap has to be made with lye to be considered “soap.”
History
The earliest record we have for soap is made by the early Egyptians. They made Aleppo soap made from laurel oil, olive oil, lye and water; a very medicinal bar of soap. We find other accounts of soap throughout history, yet it was forgotten about or unknown during certain periods of time, namely a large majority of the medieval times. Soap was often used more for cleaning animal hides and fur rather than a daily washing substance. Vikings and some celtic people have been recorded as using lye soap to clean their hair and bodies as often as once a week. The story is that some ancient culture discovered soap when cooking an animal over a fire. When the fat dripped down from the carcass into the ashes of the fire, the substance that ran down from the ashes was a bubbly soap. We actually experienced this same phenomenon before we started making soap, too. We had no idea what had happened at the time but reflection brought clarity.
How Soap is Made
When a cake is baked or a recipe typically combined the individual ingredients could be separated under a microscope. Soap is unique in that when the ingredients are mixed together, the particles actually combine to form a new substance through the process of saponification. When sodium hydroxide binds with oils/fats through heat, the result is a simple form of cleansing soap.
Hot vs. Cold Process Soap
There are two ways to make soap. In our tutorial we cover how to make hot process soap but cold process soap is very popular and desirable for people who want to make more intricate bars with brighter colors and a wider variety of ingredients. Both processes include the same base ingredients. Cold process, however, is cooked at a lower overall temperature which means the lye has to evaporate out of the bar for a minimum of 4 weeks up to 8 weeks total, which means storing it in a temperature controlled space with no interference. Since this soap is cooked at a lower temperature, it suits ingredients like goat milk and certain colorants better. Cold process soap is also more viscous when poured into the molds so it’s better suited for making swirl patterns and fancy designs with optional toppings.
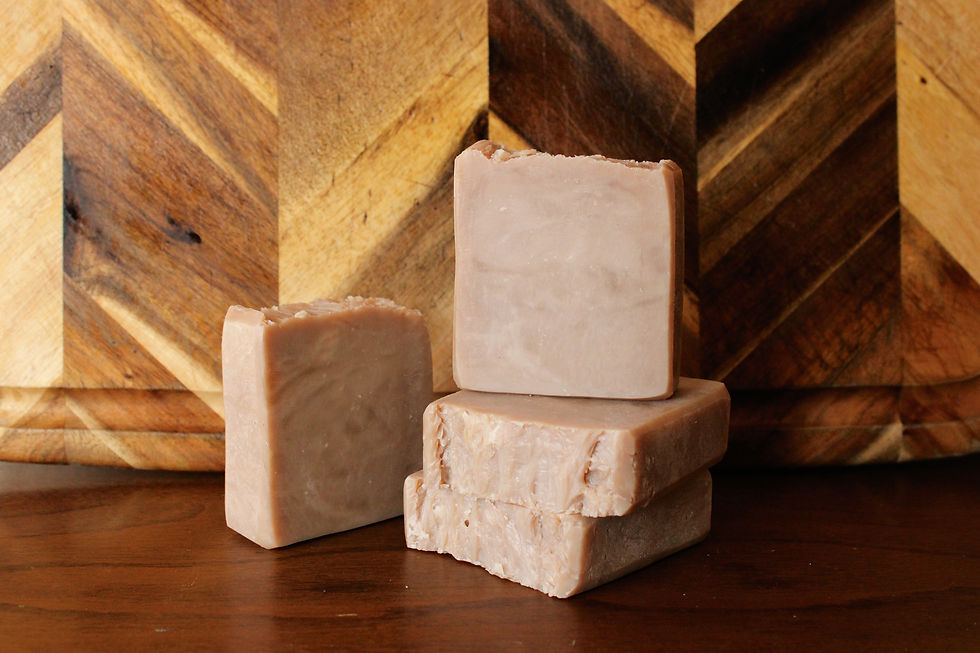
Hot process soap is cooked at or above 200 degrees F. This allows all of the lye to cook out during the process of making the soap, before pouring it into your molds. Though waiting a week for your soap to fully harden is wise, it is not mandatory for safety. It is safe to use immediately after the last cook phase is complete. Hot process soap tends to look more rustic and traditional. Though ingredients like goat milk can be added to hot process soap, it does smell like scalding milk for the duration of the cook. This smell goes away after the soap is dried, thankfully. Cooking the lye out of your bar allows for more simple storage as it can just be stored in boxes or totes with minimal air draft and spacing between bars. We prefer hot process soap for 3 main reasons… 1. It’s safe to use immediately 2. We have never had enough storage space to cure dozens of bars of soap 3. We actually prefer the rustic, simple look that hot process soap provides.
Both hot process and cold process soap methods are equally as effective in cleansing and keeping skin hydrated, they simply differ in the look of the finished product and the style of process you prefer.

Supplies List and Where to Source Ingredients
Food grade Sodium Hydroxide/lye (Essential Depot through Amazon)
Recipe
Oils/fats (Cost-co, grocery or Amazon)
Rubber gloves (local store)
Stainless steel pot (big enough to hold 3x as much as total recipe oz)
Silicone spatula (rated for over 250 degrees F)
Paper plate
Vinegar spray bottle
P-100 respirator or equivalent organic vapor protection (hardware store)
Stick-blender (Amazon or local store)
Soap molds (Amazon)
Safety glasses (hardware store)
Laser thermometer (Amazon)
Food scale (Amazon)
2 hard plastic bowls (local store)
Distilled water
Long sleeve shirt
Socks or shoes
Additives for soap i.e. essential oils, clays, micas
How to Build Your Own Recipe
Before building your own recipe let’s talk about a key term. Superfat means the amount of extra fats or oils your soap gives back to your skin. Popular soap bars you can find on the shelf at the store are typically zero percent superfat and some are processed multiple times at zero percent. Terrible. This means they actually rob your skin of hydration and can cause damage to your skin, leaving it irritated after repeated and sometimes singular uses for people with sensitive skin. We make a lot of our body bars at 5% but in drier climates like Arizona, 6% is really helpful. Shampoo bars of soap are often formulated between 3-5% superfat. Super hydrating bars for body and hands can go as high as 6-8%.
To build your own recipe, use a lye calculator. We’ve always used Bramble Berry’s Lye calculator but they recently updated it. I’m not a huge fan of the limited options but it may be better suited for beginners. There are other lye calculators on the internet if you decide you don’t like that one.
To use the calculator, first choose solid soap, ounces and your desired superfat level. 5% is a great percentage to start with. Next the calculator will have you choose your ingredients. These are chosen by parts per whole on a ratio basis. Click next and you will see that the total only gives you enough ounces for about one bar of soap. At the bottom of the recipe card, you can resize your batch to match your mold capacity. If you are only using one soap mold 38 ounces is about what you want for total oils/fats. Batch yield total will be about 55 ounces shown at the very bottom of the recipe. For two soap molds, double your recipe but be sure you have a stainless-steel pot that can support this with room to expand. Keep in mind when the soap cooks in the pot it can triple in size temporarily as it rises and combines all the molecules.
To choose oils and fats for your soap, simply consider ingredients that work well with your skin. Our base recipe consists of organic coconut oil and single sourced pure olive oil. We often add tallow and shea butter, too. Other options seem endless but here is a short list of a few: avocado oil, lard, castor oil, sunflower oil, sweet almond oil and so forth. In the lye calculator we shared above, you will see an extensive list of options on the ingredients choice page.

Preparing to Make Soap
Ensure that your cook space is well ventilated with a working hood vent and airflow or you can choose to cook your soap outside if you have a portable burner to heat your oils initially. Sanitize your cook space with vinegar or rubbing alcohol. Gather your supplies list and organize into stations. We do 3 stations. The cook station is where the pot sits on the burner, with the stick plugged in close, the paper plate, laser thermometer and spatula. On the other side of my stove, I set up my finishing additives such as essential oils, healing clays. This is also where I measure oils, lye and water on the food scale. The last station is for setting up the soap molds with room to pour and tamp the soap.
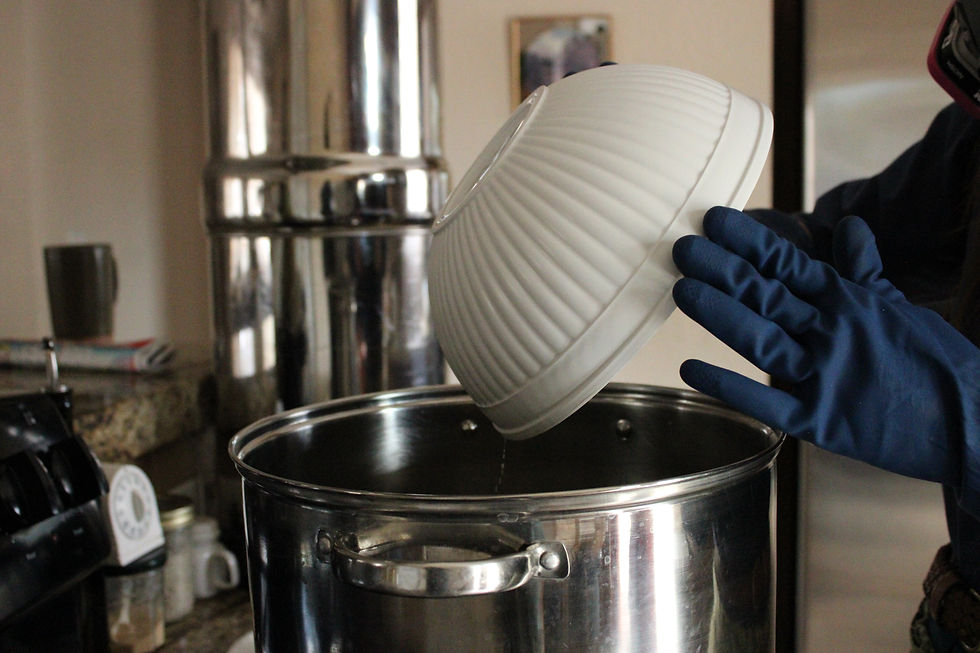
First, weigh your oils in the cook pot using your food scale. Set those aside on the burner. Turn the burner on low to slowly heat oils to 160 degrees F. Next weigh your lye crystals. Be sure to stand at arm's length away from the bowl with the ability to read your scale because the crystal powder can still aggravate your lungs. You may opt to wear your face covering for this step. Set the bowl of lye crystals aside and measure your water into the other large plastic bowl.


Safety Checklist
Vinegar for neutralizing lye burns from fumes or direct contact - keep a spray bottle close to your cook station
Rubber gloves protect your hands and skin from the lye fumes and heat
Safety glasses protect your eyes from potential burst during the cook and fumes
Long sleeved shirt and socks or closed toed shoes protect from potential bursts of hot lye
P-100 respirator or a comparable face mask keep lye from collecting in your lungs, never to escape
Create a safe environment by ensuring children and pets that don’t have breathing protection are in the other room/outside and busy for about 30 minutes when you start the cook
The Soap Cook
Total cook time: about 25 minutes
Heat oils to 160 degrees F and with a ready home for you to not be pulled away for a half hour, get on all of your safety gear. Pour lye crystals into water. Never pour water into crystals because they can explode.
Stir lye solution with your silicone spatula as it quickly heats up to nearly 200 degrees F from the chemical reaction. Use your thermometer to check temperatures often during this stage.
Once oils reach 200 degrees and lye is about 200 degrees, turn heat off and slowly pour lye solution into the sidewall of the oil pot. Place the bowls in your sink and fill with a little water.
You have reached the point of no return. Do not leave the soap or allow for distractions, if at all possible.


Begin pulsing the mixture with the stick blender on and off for the course of a minute then blend in circles until the solution becomes milky. Cover the pot with the lid until steam forms on the top and/or mixture starts to bubble. At this point stir until the mixture thickens up to a pudding-like consistency.
Be careful not to overheat your blender by blending without breaks. Remove the stick blender when the soap isn’t too active or needing a nudge. Once the soap reaches the pudding phase - known as Trace - you can let it rest for a moment. Depending on the oils you chose your soap may develop a little slower or faster than other recipes. However, the phases of development will be the same and are as follows.
Trace (pudding - milky and smooth)
Applesauce (grainy and a watery looking with minimal fluffiness)
Mashed potatoes (fluffy, mounding)
Vaseline (the soap should slide right off of the blender, oily looking, with no more rise)


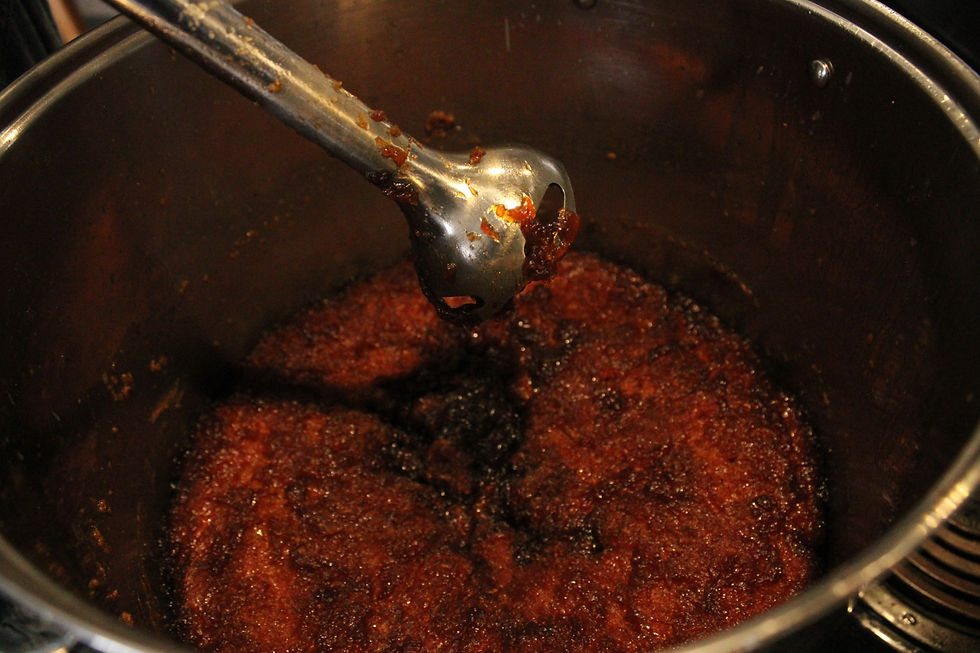
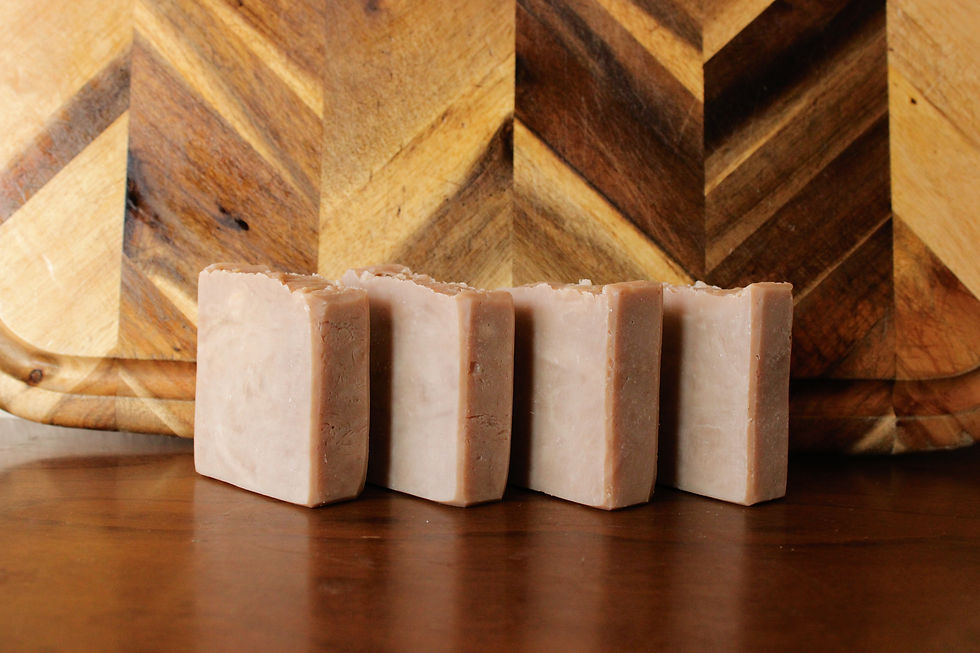
(The brown color is from adding honey at trace. Most recipes will be a tan color during the cook.)
Throughout these four phases the soap will rise, bubble and even volcano at times, not explosively, but it can surely POP. Keep a close eye on the rise and be sure to have your stick blender ready to push it through the phases reasonably. Occasionally use your spatula to scrape down the sides so everything is working through the phases evenly.
You will know your soap is cooked and safe once it reaches the Vaseline phase. It usually rises one last time after Vaseline, in my experience. At this point you can take off your safety glasses and respirator if you’d like to. The soap is technically safe to touch as far chemically speaking but the temperature is still around 200 degrees so do not touch it with your bare hands (please).

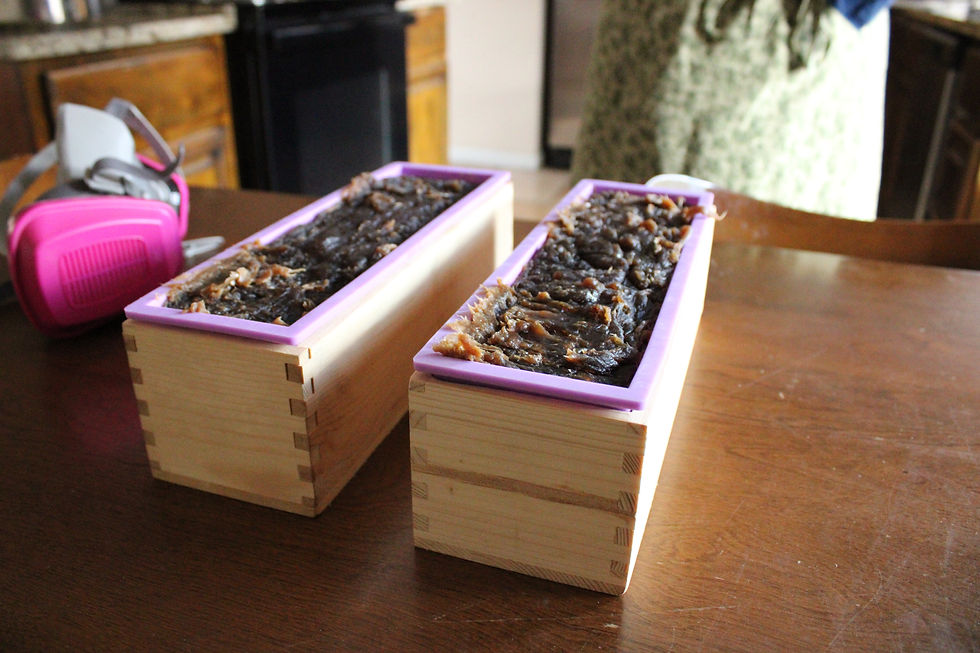
Once the soap reaches about 195 degrees F, add your essential oils, clays or micas. Stir in quickly and efficiently as the soap will begin to cool quickly. Take your pot to the mold station to fill your mold(s) halfway. At the halfway point, tamp your soap down into the mold to pop any air bubbles by pounding the wooden frame on a hard surface. Countertops work great for this step. Then quickly pour the remaining soap evenly across the top. Tamp again to pop air bubbles.
Don’t try to add little bits that have already started to set up and harden in the pot. They will not blend evenly and may fall off the top of your soap when you go to take it out of the mold. Instead, use your spatula to form a clump or ball of the remaining soap so that you can use it once it hardens.


Test out your lather (for fun!) and clean your workstation.


Follow Up
Leave the soap to harden in a cool, dry place for about 12 hours or ideally overnight. I often put it in the freezer to speed up the process if I’m excited to see the outcome, which happens regularly. If you do opt for the freezer, let it cool to room temperature first.
Once the soap is set up and hard, you may remove the silicone mold from the wooden box and peel the mold away from the soap. Let the bar rest for another half day, at least, before cutting into it. If you wait too long it will be harder to slice but doable.
To cut your soap, freely cut with a knife or score with a ruler and knife before using the knife to get even bars. Some soap mold kits also come with a slicer that can adjust for thickness.
We allow our bars to “rest” for at least a week before using them or selling them. This gives the bars a chance to harden and last longer in the soap tray.
I hope this tutorial has given you confidence to try making soap for you and your loved ones. With a house full of sensitive skin, we understand the need for soap that heals and protects.
If you have questions or concerns, feel free to write me at: bronzebasinhandmade@gmail.com
Please use caution around lye and make sure you understand the process well before starting to make soap.
Sincerely,
The Nelsons
To download this article as a printable PDF click here
The first 2 pages serve as an educational curriculum for students applicable to grants


